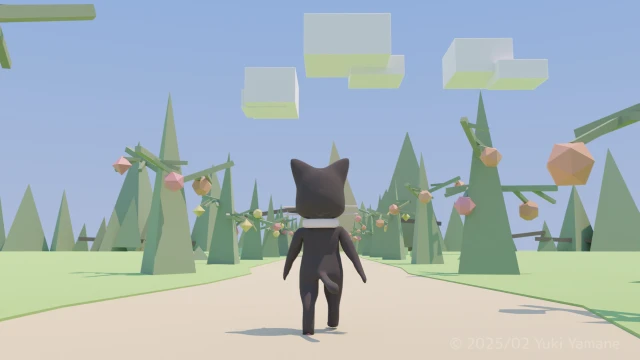
動画を見る
概要 - Abstract
久しぶりに純粋な3DCG映像作品を制作しました。アニメーションと音楽は自作です。
本記事では、制作時に考えたことや技術的な工夫を分かりやすくまとめます。
この動画を作ろうと思ったきっかけ
以下のような3Dループ動画を見たからです。
不思議で心地よい雰囲気に惹かれたのが制作の動機です。
しかし、こういった3Dループアニメを表すジャンル名はわかりません。
そもそも大勢の間で具体的に定義されていないのかもしれません。
ジャンル名が分からないと他の動画や作り方などを検索しにくいです。
自分が発信しても検索されにくいです。
基本情報
画角:水平視野60° アスペクト比16:9
フレームレート:24fps
ループ長:1分(1440フレーム)
移動距離:Blender上の500m前進
アニメーションをループさせる仕組み
ループを成立させるには、最初と最後のフレームの見た目を一致させる必要があります。
ここでは「カメラ移動」と「背景オブジェクトの同期」を中心に設計しました。
大まかな構成(全体像)
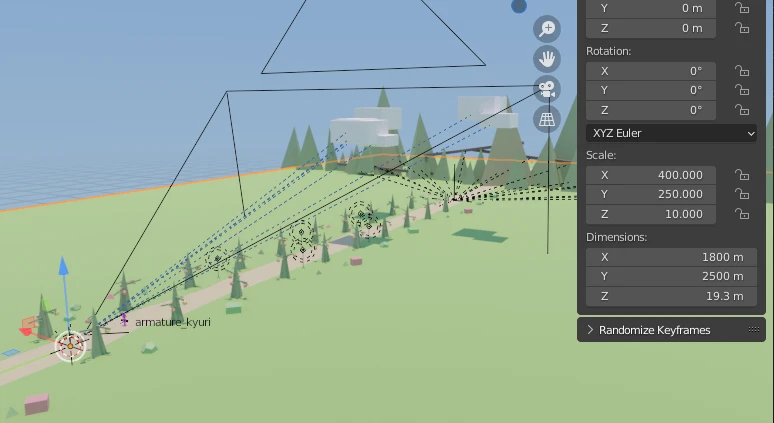
カメラ
Y軸(前方)に対して等速で移動させます。移動量はループ長に合わせて調整しています。
奥のオブジェクト(無限遠の表現)
カメラと常に一定距離を保つことで無限遠に見える表現を作りました。
カメラが進むと奥のオブジェクトも同じ速度で移動します。
地面
地面はY方向に500mの幅を持たせ、Array Modifierで奥へ連続配置しました。これにより地面が途切れるのを防ぎます。
地面から生えてくる木
木は100m間隔で10本配置。
手前の木が視界から消えたら、奥側の地面の下に瞬間移動させて再出現させることで、ループ中に常に木が生えてくるように見せています。
参考にした動画でも同様の手法が使われていました。
端の見た目が変わる問題と対策案
地面の奥行きが有限なため、カメラ移動で端が近づくと見た目が変わってしまいます。対策案は次の2つです。
- 最奥のオブジェクトで端を隠す(視界の端を覆う)
- 今回はこちらを採用
- 最奥の地面を曲面にして視覚的に遠く見せる(徐々に-Z方向へそらす)
オブジェクトの作成
木
Blender Pythonを使って自動化しました。
木はBlender Pythonで自動生成しました。正多面体を組み合わせて幹や葉の形状を作り、パラメータを変えてバリエーションを出しています。
import bpy
import bmesh
import random
import math
import numpy as np

def duplicate_object(obj_name):
    src_obj = bpy.data.objects[obj_name]
    new_obj = src_obj.copy()
    new_obj.data = src_obj.data.copy()
    new_obj.animation_data_clear()
    collection = bpy.data.collections.get("tree")
    collection.objects.link(new_obj)
    return new_obj


class Tree():
    def __init__(self):
        self.obj_list = []
        self.tree_list = []

    def create_tree(self):
        for i in range(5):
            self.obj_list = []
            tetra = duplicate_object("tetra")
            tetra.scale = (10, 10, 40)
            material = bpy.data.materials["tree_green"]
            tetra.data.materials.append(material)
            self.obj_list.append(tetra)

            degree_z_first = random.randint(0, 119)
            for j in range(3):
                cube = duplicate_object("cube")
                branch_base_z = random.randint(10, 20)
                branch_mid_z = branch_base_z + random.randint(-3, 5)

                degree = degree_z_first + j * 120

                radius = random.randint(7, 10)
                offset_z = branch_mid_z - branch_base_z

                rot_y = - math.atan2(offset_z, radius)

                cube.rotation_euler = (0, rot_y, math.radians(degree))

                x = radius * math.cos(math.radians(degree))
                y = radius * math.sin(math.radians(degree))
                branch_pos = np.array([x, y, branch_mid_z])
                cube.location = branch_pos

                cube.scale = (radius, 0.8, 0.8)

                branch_base_pos = np.array([0, 0, branch_base_z])

                material = bpy.data.materials["tree_green"]
                cube.data.materials.append(material)
                self.obj_list.append(cube)

                for k in range(3):
                    degree_2 = degree + random.randint(20, 160)
                    degree_2 %= 360
                    self.create_branch(k, branch_pos, branch_base_pos, degree_2)

            self.join()

        self.animate()

    def create_branch(self, idx, pre_main_pos, pre_base_pos, degree):
        cube = duplicate_object("cube")

        branch_range = random.randint(-3, 6) #base位置をずらす範囲
        vec = pre_main_pos - pre_base_pos
        vec_length = math.sqrt(vec[0]**2 + vec[1]**2 + vec[2]**2)
        unit_vec = np.array([vec[0] / vec_length, vec[1] / vec_length, vec[2] / vec_length])
        new_base_pos = pre_main_pos + unit_vec * branch_range

        radius = random.randint(3, 4)
        x = radius * math.cos(math.radians(degree))
        y = radius * math.sin(math.radians(degree))
        offset_z = random.randint(-2, 0)
        z = offset_z
        new_pos = new_base_pos + np.array([x, y, z])
        cube.location = new_pos

        rot_y = - math.atan2(offset_z, radius)
        cube.rotation_euler = (0, rot_y, math.radians(degree))

        cube.scale = (radius, 0.5, 0.5)
        print(f"np: {new_pos} nbp: {new_base_pos} deg: {degree}")
        material = bpy.data.materials["tree_green"]
        cube.data.materials.append(material)
        self.obj_list.append(cube)

        if idx == 0:
            self.create_fruit(new_pos, new_base_pos)

    def create_fruit(self, pre_main_pos, pre_base_pos):
        vec = pre_main_pos - pre_base_pos
        tip_pos = pre_main_pos + vec
        offset_z = -2

        obj_name = random.choice(["octa", "dodeca", "icosa"])
        obj = duplicate_object(obj_name)
        obj.location = tip_pos + np.array([0, 0, offset_z])
        obj.scale = (3, 3, 3)

        mat_name = random.choice(["fruit_red", "fruit_orange", "fruit_yellow"])
        material = bpy.data.materials[mat_name]
        obj.data.materials.append(material)
        self.obj_list.append(obj)

    def join(self):
        # Deselect all objects
        bpy.ops.object.select_all(action='DESELECT')
        # Select the objects you want to join
        for obj in self.obj_list:
            obj.select_set(True)
        # Make one of the objects the active object
        bpy.context.view_layer.objects.active = self.obj_list[0]
        # Join the selected objects
        bpy.ops.object.join()
        self.tree_list.append(self.obj_list[0])

    def animate(self):
        first_pos = (45, -450, -25)
        mid_pos = (45, -437.5, 13)
        end_2_pos = (45, 49.6528, 13)
        #end_pos = (40, 50, 6)
        frames = [-1, 0, 36, 1439]
        pos_list = [end_2_pos, first_pos, mid_pos, end_2_pos]

        for i, obj in enumerate(self.tree_list):
            offset = i * 288

            offset_y = 50 - offset * 500 / 1440
            offset_pos = (40, offset_y, 6)
            obj.location = offset_pos
            obj.keyframe_insert(data_path="location", frame=0)

            for j in range(4):
                frame = frames[j] + offset
                obj.location = pos_list[j]
                obj.keyframe_insert(data_path="location", frame=frame)

            for fcurve in obj.animation_data.action.fcurves:
                for keyframe in fcurve.keyframe_points:
                    keyframe.interpolation = 'LINEAR'


create_tree = Tree()
create_tree.create_tree()
ライティング
太陽の動きをシミュレート
太陽の動きをシミュレートし、1分で昼夜がループする表現にしました。
緯度・経度・日付から「太陽の見かけ上の位置」と「太陽の色」「空の色」を計算しています。
Blender Pythonを利用し、1フレーム枚にキーフレームを打っています。
import bpy
import math
import colorsys

def convert_hsv_to_rgb_normed(hsv, alpha=1):
    h_n = hsv[0] / 360
    s_n = hsv[1] / 100
    v_n = hsv[2] / 100
    rgb = colorsys.hsv_to_rgb(h_n, s_n, v_n)
    rgba = rgb + (alpha,)
    return rgba

def convert_rgb_unit_to_hsv(rgb_unit):
    hsv = colorsys.rgb_to_hsv(rgb_unit[0], rgb_unit[1], rgb_unit[2])
    h = hsv[0] * 360
    s = hsv[1] * 100
    v = hsv[2] * 100
    return (h, s, v)

class MyEnvironment():
    def __init__(self):
        self.sun_obj = MySun()
        self.sky_obj = MySky(self.sun_obj.max_check_altitude)

    def animate(self):
        sun = bpy.data.objects["Sun"]

        first_time = 540
        for i in range(1440):
            timer = i + first_time
            timer %= 1440
            altitude, azimuth = self.sun_obj.calculate_angle(timer)
            zenith = 90 - altitude
            zenith_rad = math.radians(zenith)
            azimuth_rad = math.radians(azimuth * -1 + 180)
            sun.rotation_euler = (zenith_rad, 0, azimuth_rad)
            sun.keyframe_insert(data_path="rotation_euler", frame=i)

            rgb = self.sun_obj.calculate_color(timer, altitude)
            #rgb_255 = (round(rgb[0] * 255), round(rgb[1] * 255), round(rgb[2] * 255))
            #hex = "#{:02x}{:02x}{:02x}".format(*rgb_255)
            #print(hex)
            rgb_gamma = (rgb[0] ** 2.2, rgb[1] ** 2.2, rgb[2] ** 2.2)
            sun.data.color = rgb_gamma
            sun.data.keyframe_insert(data_path="color", frame=i)

            rgb_up, rgb_down = self.sky_obj.calculate_color(timer, altitude)
            rgb_list = [rgb_down, rgb_up]
            for j in range(2):
                rgb = rgb_list[j]
                #rgb_255 = (round(rgb[0] * 255), round(rgb[1] * 255), round(rgb[2] * 255))
                #hex = "#{:02x}{:02x}{:02x}".format(*rgb_255)
                rgb_gamma = (rgb[0] ** 2.2, rgb[1] ** 2.2, rgb[2] ** 2.2, 1.0)

                node_tree = bpy.context.scene.world.node_tree
                node = node_tree.nodes["ColorRamp"]

                node.color_ramp.interpolation = "EASE"
                node.color_ramp.elements[j].color = rgb_gamma
                node.color_ramp.elements[j].keyframe_insert(data_path="color", frame=i)


class MySky():
    def __init__(self, max_check_altitude):
        self.color_up_sunrise = convert_hsv_to_rgb_normed((230, 30, 100))
        self.color_up_noon = convert_hsv_to_rgb_normed((220, 70, 100))
        self.color_up_sunset = convert_hsv_to_rgb_normed((220, 50, 100))
        self.color_up_night = convert_hsv_to_rgb_normed((240, 30, 20))

        self.color_down_sunrise = convert_hsv_to_rgb_normed((300, 50, 100))
        self.color_down_noon = convert_hsv_to_rgb_normed((205, 30, 100))
        self.color_down_sunset = convert_hsv_to_rgb_normed((15, 70, 100))
        self.color_down_night = convert_hsv_to_rgb_normed((233, 30, 40))

        self.altitude_list = [-18, 0, max_check_altitude]

    def calculate_color(self, current_time, altitude):
        ratio, i = self.convert_unit(altitude)
        color_up = self.mix_color_up(current_time, ratio, i)
        color_down = self.mix_color_down(current_time, ratio, i)
        return color_up, color_down

    def convert_unit(self, alti):
        length = len(self.altitude_list)
        mapped_alti = alti
        for i in range(1, length): #今の高度がどの範囲に属しているか求める
            if alti < self.altitude_list[i]:
                if alti < self.altitude_list[0]: #-18以下なら、 とする
                    mapped_alti = self.altitude_list[0]
                break
        ratio = (mapped_alti - self.altitude_list[i-1]) / (self.altitude_list[i] - self.altitude_list[i-1])
        return ratio, i

    def mix_color_up(self, current_time, ratio, y_list_idx):
        color = []
        for i in range(3):
            if current_time < 720:
                y_list = [self.color_up_night[i], self.color_up_sunrise[i], self.color_up_noon[i]]
            else:
                y_list = [self.color_up_night[i], self.color_up_sunset[i], self.color_up_noon[i]]
            y = y_list[y_list_idx-1] + ratio * (y_list[y_list_idx] - y_list[y_list_idx-1])
            color.append(y)
        return color

    def mix_color_down(self, current_time, ratio, y_list_idx):
        color = []
        for i in range(3):
            if current_time < 720:
                y_list = [self.color_down_night[i], self.color_down_sunrise[i], self.color_down_noon[i]]
            else:
                y_list = [self.color_down_night[i], self.color_down_sunset[i], self.color_down_noon[i]]
            y = y_list[y_list_idx-1] + ratio * (y_list[y_list_idx] - y_list[y_list_idx-1])
            color.append(y)
        return color

class MySun():
    def __init__(self):
        self.color_rise = convert_hsv_to_rgb_normed((15, 60, 100))
        self.color_noon = convert_hsv_to_rgb_normed((20, 20, 100))
        self.color_set = convert_hsv_to_rgb_normed((20, 60, 100))

        self.color_pre_rise = convert_hsv_to_rgb_normed((15, 60, 100))
        self.color_after_set = convert_hsv_to_rgb_normed((20, 60, 100))

        self.color_night = convert_hsv_to_rgb_normed((0, 0, 0))

        self.day_of_year = 180 #1月1日が0

        self.hour = 0
        self.minute = 0

        self.latitude = 25
        self.longitude = 0

        self.max_check_altitude = None
        self.min_check_altitude = -18
        self.declination = self.solar_declination()
        self.calculate_max_min_check_altitude()

        self.altitude_list = [-18, -0.5, 0.5, self.max_check_altitude]

    def calculate_max_min_check_altitude(self):
        self.max_check_altitude = 90 - self.latitude + self.declination

    def convert_unit(self, alti):
        length = len(self.altitude_list)
        mapped_alti = alti
        for i in range(1, length): #今の高度がどの範囲に属しているか求める
            if alti < self.altitude_list[i]:
                if alti < self.altitude_list[0]: #-18以下なら、 とする
                    mapped_alti = self.altitude_list[0]
                break
        ratio = (mapped_alti - self.altitude_list[i-1]) / (self.altitude_list[i] - self.altitude_list[i-1])
        return ratio, i

    def calculate_color(self, current_time, altitude):
        ratio, i = self.convert_unit(altitude)
        color = self.mix_color(current_time, ratio, i)
        return color

    def mix_color(self, current_time, ratio, y_list_idx):
        color = []
        for i in range(3):
            if current_time < 720:
                y_list = [self.color_night[i], self.color_pre_rise[i], self.color_rise[i], self.color_noon[i]]
            else:
                y_list = [self.color_night[i], self.color_after_set[i], self.color_set[i], self.color_noon[i]]

            y = y_list[y_list_idx-1] + ratio * (y_list[y_list_idx] - y_list[y_list_idx-1]) #例:ratioが1なら+1の値と同じ
            color.append(y)

        self.color_current = tuple(color) + (1,)
        return color

    def calculate_angle(self, current_time):
        self.hour = current_time / 60
        self.declination = self.solar_declination()
        self.hour_angle = self.solar_hour_angle()
        self.altitude = self.solar_altitude()
        self.azimuth = self.solar_azimuth()
        return self.altitude, self.azimuth

    def solar_declination(self):
        # 太陽の赤緯を計算
        return 23.44 * math.sin(math.radians((360 / 365) * (self.day_of_year - 81)))

    def solar_hour_angle(self):
        # 太陽の時角を計算
        solar_time = self.hour + self.minute / 60 + (4 * self.longitude) / 60
        return (solar_time - 12) * 15

    def solar_altitude(self):
        # 太陽の高度角を計算
        latitude_rad = math.radians(self.latitude)
        declination_rad = math.radians(self.declination)
        hour_angle_rad = math.radians(self.hour_angle)
        return math.degrees(math.asin(math.sin(latitude_rad) * math.sin(declination_rad) +
                                    math.cos(latitude_rad) * math.cos(declination_rad) * math.cos(hour_angle_rad)))

    def solar_azimuth(self):
        # 太陽の方位角を計算
        latitude_rad = math.radians(self.latitude)
        declination_rad = math.radians(self.declination)
        hour_angle_rad = math.radians(self.hour_angle)
        altitude_rad = math.radians(self.altitude)

        cos_a = (math.sin(declination_rad) - math.sin(latitude_rad) * math.sin(altitude_rad)) / \
            (math.cos(latitude_rad) * math.cos(altitude_rad))

        if 1 < cos_a:
            cos_a = 1
        elif cos_a < -1:
            cos_a = -1
        azimuth_rad = math.acos(cos_a)

        if self.hour_angle > 0:
            azimuth_rad = 2 * math.pi - azimuth_rad
        return math.degrees(azimuth_rad)

env = MyEnvironment()
env.animate()
レンダリング
カラーコレクション、カラーグレーディング
Blenderでのレンダリングは暗めに出たため、ポストプロセッシングで明るさを調整しました。
色相は変更していませんが、適切な色調補正を加えればさらに雰囲気が良くなったでしょう。
その他
レンダリング時間は約12時間になりました。
出力ファイルサイズはEXRで約5GBになりました。
レンダリング自体は2024年12月に終わりましたが、音楽の完成が2025年2月になりました。
音楽
ここからは音楽の解説です。
用語の整理
調性引力論 ❸ カーネルについて - SoundQuest
調性引力論 ❺ シェルについて - SoundQuest
ここでは、SoundQuestで発祥された用語「カーネル (Kernel)」「シェル (Shell)」を使います。
- カーネル:調(キー)から見た度数(例:Cメジャーキーで「ド」 → 1、「ミ」 → 3)
- シェル:コードのルートから見た度数(例:Cコードで「ラ」→ 6)
- 二つを組み合わせた例:Cメジャーキー上のAmコード上の「ミ」 → カーネル: 3、シェル: 5
詳しい解説はSoundQuestをご覧ください。
概要 - Abstract
AメロBメロはシンプルにあまりこだわらずに作りました。なのでサビの解説が主です。
サビは良い感じにして、AメロとBメロはシンプルにして手を抜く。上手くいけば、低コストで作曲できるでしょう。
使用音源と楽器
音源
Studio One付属音源、PreSonus Symphonic Orchestra、Sound Engine - Upright Pianos
楽器
ピッコロ トロンボーン チェロ ピアノ マリンバ ハープ カスタネット 電子音
コード
原曲のコード進行を示し、度数表記とCメジャーに移した場合の対応を掲載しました。
サビのコード進行
原曲のコード
| E | B | C#m | G#m | A | G#m | F#m | B - Cdim |
| C#m | G#m | A | E | D | C#m | F#m | Am |
| E |
度数表記
| I | V | VIm | IIIm | IV | IIIm | IIm | V - V#dim |
| VIm | IIIm | IV | I | VIIb | VIm | IIm | IVm |
| I |
調をCメジャーにしたコード
| C | G | Am | Em | F | Em | Dm | G - G#dim |
| Am | Em | F | C | Bb | Am | Dm | Fm |
| C |
解説
サビ最初の8小節はカノンコード系です。
サビ次の8小節の前半(つまり4小節)は、短調版のカノンコードにしました。
しかし、サビ前半とサビ後半でメロディは変えていません。
コードは違う、メロディは同じ。良い感じの雰囲気があるでしょう。
参考文献
アニメ「たまごっち」の挿入歌「七色メロディ」のAメロ(?)のコード進行を参考にしました。
こころーにある... ...さかせるよー。の部分です。
【MAD】七色メロディ【GO-GO たまごっち!】 - YouTube
メロディ
画像がかなり見にくいですが、今回のところは勘弁してください。
midiを視覚化する。今回は画像編集ソフトで力技で描きました。
しかし、自動化するためのアプリを開発中です。次回までには完成させたいです。Yuki Yamaneの次回作にご期待ください。
サビ前半 初めの4小節
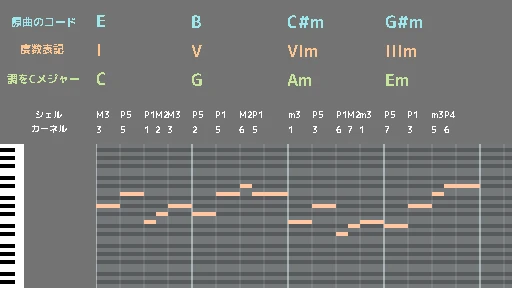
サビ前半 次の4小節
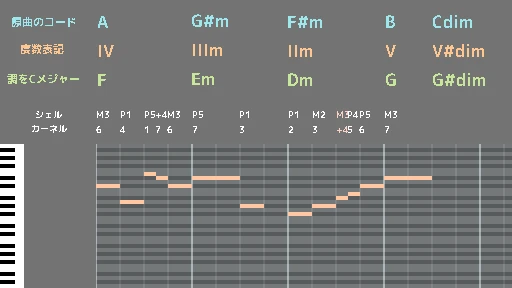
サビ後半 初めの4小節
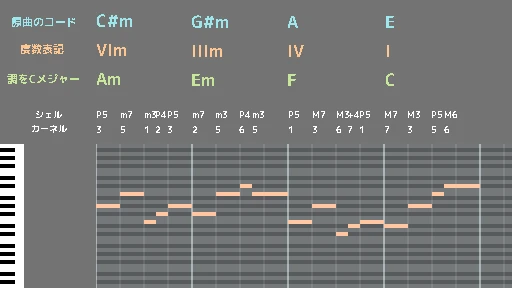
サビ後半 次の4小節~エンド
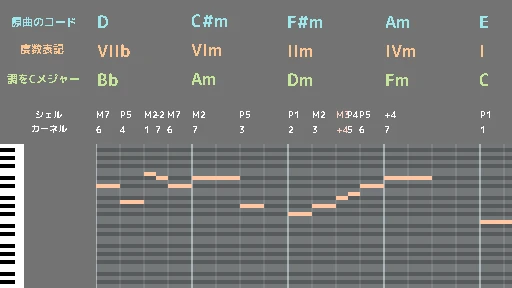
メロディの繰り返し
前半は2度下げて繰り返す
カノンコードでは、(C G → Am Em)コードも2度下がっているので、メロディも自然に繰り返せます。
5小節からは1小節のメロディのカーネルを反転させる
カーネル反転は「元のカーネルに足すと9になる値に変換する」操作です(例:1→8、2→7、3→6)。
1小節目~2小節目頭のカーネルは[3, 5, 1, 2, 3][2]なので、それを反転すると[6, 4, 1, 7, 6][7]です。
完全な繰り返しではない、おしゃれです。
使用ツール(一部)
- プログラミング言語:Python
- ライブラリ、ゲームエンジン:Panda3D
- テキストエディタ:Visual Studio Code
- 2Dグラフィック:Clip Studio Paint
- 3Dモデリング:Blender
- サウンド:Studio One
- 音源:付属音源, PreSonus Symphonic Orchestra, Sound Engine - Upright Pianos
- 動画編集:DaVinci Resolve
- アシスタント:Microsoft Copilot
検索用キーワード
作品, 自主制作アニメ, 3DCG, Blender, Blender3D, オリジナル曲, 自作曲, インスト, ケモノ, 動物